Using GNU autotest for running unit tests

Using GNU autotest for running unit tests

This is part of a series of blog posts about testing inside the OpenBSC/Osmocom project. In this post I am focusing on our usage of GNU autotest.

The GNU autoconf ships with a not well known piece of software. It is called GNU autotest and we will focus about it in this blog post.

GNU autotest is a very simple framework/test runner. One needs to define a testsuite and this testsuite will launch test applications and record the exit code, stdout and stderr of the test application. It can diff the output with expected one and fail if it is not matching. Like any of the GNU autotools a log file is kept about the execution of each test. This tool can be nicely integrated with automake’s make check and make distcheck. This will execute the testsuite and in case of a test failure fail the build.

The way we use it is also quite simple as well. We create a simple application inside the test/testname directory and most of the time just capture the output on stdout. Currently no unit-testing framework is used, instead a simple application is built that is mostly using OSMO_ASSERT to assert the expectations. In case of a failure the application will abort and print a backtrace. This means that in case of a failure the stdout will not not be as expected and the exit code will be wrong as well and the testcase will be marked as FAILED.

The following will go through the details of enabling autotest in a project.

Enabling GNU autotest

The configure.ac file needs to get a line like this: AC_CONFIG_TESTDIR(tests). It needs to be put after the AC_INIT and AM_INIT_AUTOMAKE directives and make sure AC_OUTPUT lists tests/atlocal

Integrating with the automake

The next thing is to define a testsuite inside the tests/Makefile.am. This is some boilerplate code that creates the testsuite and makes sure it is invoked as part of the build process.

 # The `:;' works around a Bash 3.2 bug when the output is not writeable.  
 $(srcdir)/package.m4: $(top_srcdir)/configure.ac  
  :;{   
         echo '# Signature of the current package.' &&   
         echo 'm4_define([AT_PACKAGE_NAME],' &&   
         echo ' [$(PACKAGE_NAME)])' &&;   
         echo 'm4_define([AT_PACKAGE_TARNAME],' &&   
         echo ' [$(PACKAGE_TARNAME)])' &&   
         echo 'm4_define([AT_PACKAGE_VERSION],' &&   
         echo ' [$(PACKAGE_VERSION)])' &&   
         echo 'm4_define([AT_PACKAGE_STRING],' &&   
         echo ' [$(PACKAGE_STRING)])' &&   
         echo 'm4_define([AT_PACKAGE_BUGREPORT],' &&   
         echo ' [$(PACKAGE_BUGREPORT)])';   
         echo 'm4_define([AT_PACKAGE_URL],' &&   
         echo ' [$(PACKAGE_URL)])';   
        } &>'$(srcdir)/package.m4'  
 EXTRA_DIST = testsuite.at $(srcdir)/package.m4 $(TESTSUITE)  
 TESTSUITE = $(srcdir)/testsuite  
 DISTCLEANFILES = atconfig  
 check-local: atconfig $(TESTSUITE)  
  $(SHELL) '$(TESTSUITE)' $(TESTSUITEFLAGS)  
 installcheck-local: atconfig $(TESTSUITE)  
  $(SHELL) '$(TESTSUITE)' AUTOTEST_PATH='$(bindir)'   
  $(TESTSUITEFLAGS)  
 clean-local:  
  test ! -f '$(TESTSUITE)' ||   
  $(SHELL) '$(TESTSUITE)' --clean  
 AUTOM4TE = $(SHELL) $(top_srcdir)/missing --run autom4te  
 AUTOTEST = $(AUTOM4TE) --language=autotest  
 $(TESTSUITE): $(srcdir)/testsuite.at $(srcdir)/package.m4  
  $(AUTOTEST) -I '$(srcdir)' -o $@.tmp $@.at  
  mv $@.tmp $@  

Defining a testsuite

The next part is to define which tests will be executed. One needs to create a testsuite.at file with content like the one below:
 AT_INIT  
 AT_BANNER([Regression tests.])  
 AT_SETUP([gsm0408])  
 AT_KEYWORDS([gsm0408])  
 cat $abs_srcdir/gsm0408/gsm0408_test.ok > expout  
 AT_CHECK([$abs_top_builddir/tests/gsm0408/gsm0408_test], [], [expout], [ignore])  
 AT_CLEANUP  
This will initialize the testsuite, create a banner. The lines between AT_SETUP and AT_CLEANUP represent one testcase. In there we are copying the expected output from the source directory into a file called expout and then inside the AT_CHECK directive we specify what to execute and what to do with the output.

Executing a testsuite and dealing with failure

The testsuite will be automatically executed as part of make check and make distcheck. It can also be manually executed by entering the test directory and executing the following.

 $ make testsuite  
 make: `testsuite' is up to date.  
 $ ./testsuite  
 ## ---------------------------------- ##  
 ## openbsc 0.13.0.60-1249 test suite. ##  
 ## ---------------------------------- ##  
 Regression tests.  
  1: gsm0408                     ok  
  2: db                       ok  
  3: channel                     ok  
  4: mgcp                      ok  
  5: gprs                      ok  
  6: bsc-nat                     ok  
  7: bsc-nat-trie                  ok  
  8: si                       ok  
  9: abis                      ok  
 ## ------------- ##  
 ## Test results. ##  
 ## ------------- ##  
 All 9 tests were successful.  
In case of a failure the following information will be printed and can be inspected to understand why things went wrong.
  ...  
  2: db                       FAILED (testsuite.at:13)  
 ...  
 ## ------------- ##  
 ## Test results. ##  
 ## ------------- ##  
 ERROR: All 9 tests were run,  
 1 failed unexpectedly.  
 ## -------------------------- ##  
 ## testsuite.log was created. ##  
 ## -------------------------- ##  
 Please send `tests/testsuite.log' and all information you think might help:  
   To: 
   Subject: [openbsc 0.13.0.60-1249] testsuite: 2 failed  
 You may investigate any problem if you feel able to do so, in which  
 case the test suite provides a good starting point. Its output may  
 be found below `tests/testsuite.dir'.  
You can go to tests/testsuite.dir and have a look at the failing tests. For each failing test there will be one directory that contains a log file about the run and the output of the application. We are using GNU autotest in libosmocore, libosmo-abis, libosmo-sccp, OpenBSC, osmo-bts and cellmgr_ng.
OpenBSC/Osmocom continuous integration with Jenkins

OpenBSC/Osmocom continuous integration with Jenkins

This is part of a series of blog posts about testing inside the OpenBSC/Osmocom project. In this post I am focusing on continuous integration with Jenkins.

Problem

When making a new release we often ran into the problem that files were missing from the source archive. The common error was that the compilation failed due some missing header files.
The second problem came a bit later. As part of the growth of OpenBSC/Osmocom we took code from OpenBSC and moved it into a library called libosmocore to be used by other applications. In the beginning our API and ABI of this new library was not very stable. One thing that could easily happen is that we updated the API, migrated OpenBSC to use the new API but forgot to update one of the more minor projects, e.g. our TETRA decoder. 

Solution

The solution is quite simple. The GNU Automake buildsystem already provides a solution to the first problem. One simply needs to call make distcheck. This will create a new tarball and then build it. Ideally all developers use make distcheck before pushing a change into our repository but in reality it takes too much to do this and one easily forgets this step.
Luckily CPU time is getting more and more affordable. This means that we can have a system that will run make distcheck after each commit. To address the second part of the problem we can rebuild all users of a specific library, and do this recursively.
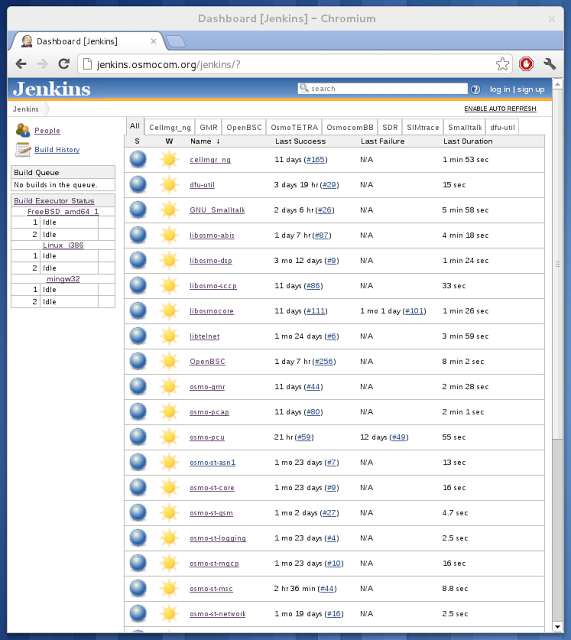
The buzzword for this is Continuous Integration and the system of our choice is Jenkins (formerly known as Hudson). Jenkins has the concept of a Job and a Node. A Job can be building a certain project, e.g. building libosmocore. A Node is a physical system with a specific compiler. A Job can instruct Jenkins to monitor our git repositories and then schedule the job to be build.
In our case we have nodes for FreeBSD/AMD64, Debian6.0/i386 and mingw/i386. All our projects are multi-configuration projects. For some of our Jobs we use it to build the software on FreeBSD, Debian and mingw for others only on Debian. Another useful feature is the matrix build. This way one job can build several different configurations, e.g. debug and release.
Jenkins allows us to have dependencies between Jobs and we are using this to rebuild the users of a library after a change, e.g. build libosmo-abis after libosmocore.
The build-status can be reported by EMail, irc but I generally use the RSS feed feature to find out about broken builds. This way I will be made aware of build breakages and can escalate it by talking to the developer that has caused the breakage.
Jenkins of Osmocom

Conclusion

The installation of Jenkins makes sure that the tarballs built with make dist contains everything needed to build the software package and we have no silent build breakages in less active sub-projects. A nice side-effect is that we have less Emails from users due build breakages. Setting up Jenkins is easy and everyone building software should have Jenkins or a similar tool.

Outlook

We could have more build nodes for more Linux distributions and versions. This mainly depends on volunteers donating CPU time and maintaining the Jenkins Node. Jenkins offers a variety of plugins and it appears to be easy to write new plugins. We could have plugins that monitor and plot the binary size of our libraries, check for ABI breakages, etc.
Testing in OpenBSC and Osmocom

Testing in OpenBSC and Osmocom

The OpenBSC and Osmocom project has grown a lot in recent years. It has grown both in people using our code, participating in the development and also in terms of amount of sourcecode. As part of the growth we have more advanced testing and the following blog posts will show what we are doing.

Each post will describe the problems we were facing and how the system deployed is helping us to resolve these issues.