Cisco probeless monitoring protocol

Cisco probeless monitoring protocol

The Cisco probeless monitoring protocol (pmp) is a proprietary protocol used by the Cisco ITP. This protocol is used to forward M3UA/MTPL3 messages to another server. The data is being sent on port 33500 using UDP.

Previously I used okteta to study the file format and this time I used Pages and HexFiend. To understand the basic structure one needs to start somewhere. The first assumption for a telco protocol is DER or TLV encoded data. In wireshark one could already see some ascii strings and the first step is to search for a Tag (T) and a Length (L) in front of it. I didn’t find a tag but the length was there. At the same time the number of octets to express the length appears to depend on the data that follows. This means the data is certainly not DER encoded. In front of a block of information i found a header that contains the command. The highest bits seems to encode C/R, there is a sequence number and something else I can’t decode (doesn’t look like a MAC address and not like a time).

I copied the data from HexFiend into an editor document and then used new lines and indentions to illustrate the grouping. This is how I found the “number of messages” field for the data and saw that a message has no size by itself.

After having understood the basic structure I started with a wireshark dissector is around 200 lines of code. It still needs some clean-up, better presentation of the data, checking with fuzzed data packages and then I can propose it for inclusion in wireshark.

The state of mobile telecommunication protocol design and the way ahead

The state of mobile telecommunication protocol design and the way ahead

I have been implementing various ETSI/3GPP specifications for more than a decade. At GMIT we provided implementation feedback for DVB-H and OMA BCAST. With the Osmocom project and Sysmocom I have several years of implementing GSM (and UTRAN) specifications on my back.

In general GSM is a great engineering project. It lead to the creation of the ETSI, they adopted the English language for their specifications and they applied the information hiding principle. The group speciale mobile managed to create well described components that communicate through fully specified interfaces. Somebody implementing a SIM card does not need to know about a VLR. Somebody implementing a VLR does not need to know about the AuC. Somebody implementing a BTS doesn’t need to know about the MSC.

This summer and in December severe privacy issues on ETSI/3GPP MAP have been revealed. At the 31C3 there will be two in-depth talks about different aspects of it and some of the issues have given us a nice laugh, some the OMG feeling, some gave us pity but I am a software engineer so the question is how did we end up in this situation? ETSI/3GPP MAP was designed at the time SS7 was a walled garden and when it came to telephony one nation could trust another. This trust model fell apart with the liberation of the telephony industry but the specification was not updated. ETSI/3GPP MAP went through several phases and they have had some really bad design choices that are thankfully (or thanks to capitalism) ceased out from the network. All of the issues found and disclosed appear to be bugs in the specification and not a specific implementation. ETSI/3GPP MAP is an old protocol and while one could improve the specification to fix the protocol it is unlikely that new implementations would be rolled out.

But there is hope, there is a new protocol. The protocol was designed in a world where IP was well understood. We had big security issues, viruses, worms, targeted attacks. The basic trust model had changed to a world where one needs to protect oneself. The protocol is called DIAMETER and will power true 4G networks. It is based on the well known RADIUS protocol that many people may know from eduroam.

So do we just need to wait until most networks deploy 4G and we will be more secure against privacy disclosure and other attacks? 3GPP has even created interworking between MAP and DIAMETER. This is done by mapping one or more MAP operations to calls to DIAMETER. Wait what? How can this be possible? It is possible because the fundamental design and trust model is the same. If you tell a HLR/HSS that a subscriber is in your network then they will believe it. While RADIUS was verifying credentials in the home server, in DIAMETER it is not part of what a HSS has to do. This means a subscriber can be still be hijacked.

My understanding of DIAMETER is still very small but it is quite clear that the protocol and mindset is bug-compatible and only the encoding and number of messages has changed.

So where does it leave us? And what should we do?

  • We should have the “public” attend 3GPP meetings to push for better specifications.
  • We should try to stop the DIAMETER roll-out before we have an insecure legacy system long before the old one has been ceased out.
  • We need to push for mobile stacks that only implement L1 and have Free Software that implements the protocol (who wants to have a SIP, UDP and IPsec stack in a proprietary baseband processor?)
  • We need strong End-to-End encryption. But for that we need to be able to control more of the telephony part. Make it possible to run SIP over TLS servers that can interconnect with each other. Make sure that your Network Operator just gives you IP and you handle your telephony yourself.
  • We need to push for protocol design that limits and reduces the overhead around the IP header.
  • We need interest groups and funding that make that possible.
Speeding up my SIP/MGCP Smalltalk Parsers

Speeding up my SIP/MGCP Smalltalk Parsers

When creating the MGCP and SIP implementation I didn’t want to do string splitting/scanning myself but follow the grammar of the two RFCs. I decided to use the PetitParser framework. PetitParser is a parsing
combinator. Which mostly mean you create small parsers and combine them with things like a sequence (parse this, than that and expect the input to be fully consumed).

For a long time this approach was just okay but I recently started to use the code on a under powered ARM system and the performance started to hurt. The MGCP/SIP Parser is created at runtime and then the result will be used.

Measuring

Besides things being too slow it is important to know how slow it is and to see if a change has made a difference or not. GNU Smalltalk has a Time class that provides a monotonic nanosecond clock. The easiest way to benchmark is to use an approach like:
 [ | start | start := Time nanosecondClock. benchmarkCode. start – Time nanosecondClock] value.

This will give me a number. Now with a language like Smalltalk there will be extra runtime code so there will be a noticeable variance.

Improving the PetitParser GNU Smalltalk port

PetitParser needs to use backtracking to go back in the stream when one element of a choice could not be parsed. This means PetitParser will heavily exercise >>#position, >>#position: and >>#atEnd. In Pharo the implementation has a position variable but in GNU Smalltalk the implementation has a pointer that points to the next character. When a method is called in Smalltalk an activation record (stack frame, context) needs to be created. GNU Smalltalk has the optimization to detect methods that simply return a value or instance variable. In the case of >>#position and >>#position: an arithmetic operation will be executed and can not be optimized. I have decided to change the PetitParser code to use >>#pointer and >>#pointer: to avoid the extra activation cost.

Local PetitParser hacks

In my older port of PetitParser.209 the PPRepeatingParser class will store the parsed elements in an OrderedCollection and at the end convert it to an Array. My client code will simply iterate over the
result and I don’t need to pay the price of the extra memory collection and copying.
With Smalltalk and open classes I can simply load my own/improved/reduced version of the >>#parseOn:
and benefit for the speed-gain in my implementation.

Speeding up parser construction

In PetitParser one defines the parser in selectors and on creating everything from the >>#start will be turned into the parser. In case some basic parsers are re-used one can create instance variables and the PetitParser baseclass will then cache the result in that variable. In the past I haven’t used this mode too much but I had a lot of parts that are used more than once. This was a significant speed-up in parser construction. At least in PetitParser.209 (I think later versions had some improvements) not every caching will make things more quick. It is good to benchmark both number of created parsers and number construction speed.

Simplifying the Grammar

In both MGCP and SIP I have a SIPGrammar/MGCPGrammar class and then a subclass called SIPParser/MGCPParser that creates a structure my client code can work with. When creating the SIPGrammar/MGCPGrammar I followed the RFC BNF but e.g. for matching the possible parameters I had to create a choice parser with many many choices but all of them are in the form of “Key: Value”. So instead of checking the valid keys with the Grammar, I should check the structure in the grammar and do the key validation inside the parser class.

Using PetitParser instead of following the Grammar

In the case of SIP there a lot of rules that specify where whitespace can be. This means I created PPSequenceParsers where some elements consume the space that nobody cares about it. The PPParser class already knows the >>#trim selector to deal with such things. It will automatically take away leading and trailing whitespace.
In SIP (e.g. with the challenge BNF) there is one mandatory parameter followed by optional elements separated by comas. PetitParser has a built-in way to express such things. The >>#separatedBy: selector will take a parser (e.g. one that can parse a comma) as parameter and then parse one or more occurrences.

Using PPObjectPredicateParser

In PetitParser one can write #digit asParser / #word asParser and this will either parse a single digit or a single character. In both cases a PPObjectPredicateParser with a PPCharsetPredicate (with an internal look-up table) will be created. I had many of such occurrences and could simplify the code.

Creating a custom parser

In SIP some parameters can be of the nature of key=value or key=”VALUE”. The later is a quoted-string that permits certain characters and certain escape sequences. The rule to parse this were nested character parsers of choices of choices. The resulting parser was very slow. A simple string to parse a nonce with a quoted-string could take 40ms. I decided to write my own SIPQuotedStringParser.

Summary

The MGCPParser construction time was in the range of 20 seconds, after the change we are in the ballpark of a second or such and the situation was similar for the SIPParser. A testcase to parse a 401 SIP message went from 200ms to 70ms. This is on a slow ARM with the plain interpreter and there should still be some room for improvements.

Outlook

I think PetitParser could have some further optimizations. Instead of the PPCharSetPredicate and the PPObjectPredicateParser there could be a PPCharSetPredicateParser that avoids the call to >>#value:. and one creating two PPCharSetPredicateParsers and joining them with a PPChoiceParser one could simply join the two look-up tables. This would optimize #digit asParser / #blank asParser and save one LookupTable. The next thing would be to create sparse PPCharSetPredicate when one knows that only a subset will be filled.
In terms of GNU Smalltalk we need to port to GNU lightning 2.0 and we would gain JIT support for ARM and can take it from there as well. Another option would be to start having ByteCode to ByteCode optimizations like inlining often called methods (with and without OSR).
Last but not least we could use MrGwen’s GNU lightning bindings and JIT a parser from the PetitParser representation.
Using GNU autotest for running unit tests

Using GNU autotest for running unit tests

This is part of a series of blog posts about testing inside the OpenBSC/Osmocom project. In this post I am focusing on our usage of GNU autotest.

The GNU autoconf ships with a not well known piece of software. It is called GNU autotest and we will focus about it in this blog post.

GNU autotest is a very simple framework/test runner. One needs to define a testsuite and this testsuite will launch test applications and record the exit code, stdout and stderr of the test application. It can diff the output with expected one and fail if it is not matching. Like any of the GNU autotools a log file is kept about the execution of each test. This tool can be nicely integrated with automake’s make check and make distcheck. This will execute the testsuite and in case of a test failure fail the build.

The way we use it is also quite simple as well. We create a simple application inside the test/testname directory and most of the time just capture the output on stdout. Currently no unit-testing framework is used, instead a simple application is built that is mostly using OSMO_ASSERT to assert the expectations. In case of a failure the application will abort and print a backtrace. This means that in case of a failure the stdout will not not be as expected and the exit code will be wrong as well and the testcase will be marked as FAILED.

The following will go through the details of enabling autotest in a project.

Enabling GNU autotest

The configure.ac file needs to get a line like this: AC_CONFIG_TESTDIR(tests). It needs to be put after the AC_INIT and AM_INIT_AUTOMAKE directives and make sure AC_OUTPUT lists tests/atlocal

Integrating with the automake

The next thing is to define a testsuite inside the tests/Makefile.am. This is some boilerplate code that creates the testsuite and makes sure it is invoked as part of the build process.

 # The `:;' works around a Bash 3.2 bug when the output is not writeable.  
 $(srcdir)/package.m4: $(top_srcdir)/configure.ac  
  :;{   
         echo '# Signature of the current package.' &&   
         echo 'm4_define([AT_PACKAGE_NAME],' &&   
         echo ' [$(PACKAGE_NAME)])' &&;   
         echo 'm4_define([AT_PACKAGE_TARNAME],' &&   
         echo ' [$(PACKAGE_TARNAME)])' &&   
         echo 'm4_define([AT_PACKAGE_VERSION],' &&   
         echo ' [$(PACKAGE_VERSION)])' &&   
         echo 'm4_define([AT_PACKAGE_STRING],' &&   
         echo ' [$(PACKAGE_STRING)])' &&   
         echo 'm4_define([AT_PACKAGE_BUGREPORT],' &&   
         echo ' [$(PACKAGE_BUGREPORT)])';   
         echo 'm4_define([AT_PACKAGE_URL],' &&   
         echo ' [$(PACKAGE_URL)])';   
        } &>'$(srcdir)/package.m4'  
 EXTRA_DIST = testsuite.at $(srcdir)/package.m4 $(TESTSUITE)  
 TESTSUITE = $(srcdir)/testsuite  
 DISTCLEANFILES = atconfig  
 check-local: atconfig $(TESTSUITE)  
  $(SHELL) '$(TESTSUITE)' $(TESTSUITEFLAGS)  
 installcheck-local: atconfig $(TESTSUITE)  
  $(SHELL) '$(TESTSUITE)' AUTOTEST_PATH='$(bindir)'   
  $(TESTSUITEFLAGS)  
 clean-local:  
  test ! -f '$(TESTSUITE)' ||   
  $(SHELL) '$(TESTSUITE)' --clean  
 AUTOM4TE = $(SHELL) $(top_srcdir)/missing --run autom4te  
 AUTOTEST = $(AUTOM4TE) --language=autotest  
 $(TESTSUITE): $(srcdir)/testsuite.at $(srcdir)/package.m4  
  $(AUTOTEST) -I '$(srcdir)' -o $@.tmp $@.at  
  mv $@.tmp $@  

Defining a testsuite

The next part is to define which tests will be executed. One needs to create a testsuite.at file with content like the one below:
 AT_INIT  
 AT_BANNER([Regression tests.])  
 AT_SETUP([gsm0408])  
 AT_KEYWORDS([gsm0408])  
 cat $abs_srcdir/gsm0408/gsm0408_test.ok > expout  
 AT_CHECK([$abs_top_builddir/tests/gsm0408/gsm0408_test], [], [expout], [ignore])  
 AT_CLEANUP  
This will initialize the testsuite, create a banner. The lines between AT_SETUP and AT_CLEANUP represent one testcase. In there we are copying the expected output from the source directory into a file called expout and then inside the AT_CHECK directive we specify what to execute and what to do with the output.

Executing a testsuite and dealing with failure

The testsuite will be automatically executed as part of make check and make distcheck. It can also be manually executed by entering the test directory and executing the following.

 $ make testsuite  
 make: `testsuite' is up to date.  
 $ ./testsuite  
 ## ---------------------------------- ##  
 ## openbsc 0.13.0.60-1249 test suite. ##  
 ## ---------------------------------- ##  
 Regression tests.  
  1: gsm0408                     ok  
  2: db                       ok  
  3: channel                     ok  
  4: mgcp                      ok  
  5: gprs                      ok  
  6: bsc-nat                     ok  
  7: bsc-nat-trie                  ok  
  8: si                       ok  
  9: abis                      ok  
 ## ------------- ##  
 ## Test results. ##  
 ## ------------- ##  
 All 9 tests were successful.  
In case of a failure the following information will be printed and can be inspected to understand why things went wrong.
  ...  
  2: db                       FAILED (testsuite.at:13)  
 ...  
 ## ------------- ##  
 ## Test results. ##  
 ## ------------- ##  
 ERROR: All 9 tests were run,  
 1 failed unexpectedly.  
 ## -------------------------- ##  
 ## testsuite.log was created. ##  
 ## -------------------------- ##  
 Please send `tests/testsuite.log' and all information you think might help:  
   To: 
   Subject: [openbsc 0.13.0.60-1249] testsuite: 2 failed  
 You may investigate any problem if you feel able to do so, in which  
 case the test suite provides a good starting point. Its output may  
 be found below `tests/testsuite.dir'.  
You can go to tests/testsuite.dir and have a look at the failing tests. For each failing test there will be one directory that contains a log file about the run and the output of the application. We are using GNU autotest in libosmocore, libosmo-abis, libosmo-sccp, OpenBSC, osmo-bts and cellmgr_ng.
Migrating *.osmocom.org trac installations to a new host

Migrating *.osmocom.org trac installations to a new host

Yesterday I migrated all trac installations but openbsc.osmocom.org to a new host. We are now running trac version 0.12 and all the used plugins should be installed. As part of the upgrade all tracs should be available via https.

There are various cleanups to do in the next couple of weeks. We should run a similar trac.ini on all the installations, we need to migrate from SQLite to MySQL/MariaDB, all login pages/POSTS should redirect to the https instead of doing a POST/basic auth in plain text.

We are now using a frontend nginx and the /trac/chrome/* are served from a cache and your browser is asked to cache them for 90 hours. This should already reduce the load on the server a bit and should result in better page loads.

Know your tools – mudflap

Know your tools – mudflap

I am currently implementing GSM ARFCN range encoding and I do this by writing the algorithm and a test application. Somehow my test application ended in a segmentation fault after all tests ran. The first thing I did was to use gdb on my application:

$ gdb ./si_test
(gdb) r
...
Program received signal SIGSEGV, Segmentation fault.
0x00000043 in ?? ()
(gdb) bt
#0  0x00000043 in ?? ()
#1  0x00000036 in ?? ()
#2  0x00000040 in ?? ()
#3  0x00000046 in ?? ()
#4  0x00000009 in ?? ()
#5  0xb7ff6821 in ?? () from /lib/ld-linux.so.2

The application crashed somewhere in glibc on the way to the exit. The next thing I used was valgrind but it didn’t report any invalid memory access so I had to resort to todays tool. It is called mudflap and part of GCC for a long time. Let me show you an example and then discuss how valgrind fails and how mudflap can help.

int main(int argc, char **argv) {
  int data[23];
  data[24] = 0;
  return 0;
}

The above code obviously writes out of the array bounds. But why can’t valgrind detect it? Well we are writing somewhere to the stack and this stack has been properly allocated. valgrind can’t know that &data[24] is not part of the memory to be used by data.

mudflap comes to the rescue here. It can be enabled by using -fmudflap and linking to -lmudflap this will make GCC emit extra code to check all array/pointer accesses. This way GCC will track all allocated objects and verify the access to memory before doing it. For my code I got the following violation.

mudflap violation 1 (check/write): time=1350374148.685656 ptr=0xbfd9617c size=4
pc=0xb75e1c1e location=`si_test.c:97:14 (range_enc_arfcns)'
      /usr/lib/i386-linux-gnu/libmudflap.so.0(__mf_check+0x3e) [0xb75e1c1e]
      ./si_test() [0x8049ab5]
      ./si_test() [0x80496f6]
Nearby object 1: checked region begins 29B after and ends 32B after
mudflap object 0x845eba0: name=`si_test.c:313:6 (main) ws'
I am presented with the filename, line and function that caused the violation, then I also get a backtrace, the kind of violation and on top of that mudflaps informs me which objects are close to the address I allocated. So in this case I was writing to ws outside of the bounds.
OpenBSC/Osmocom continuous integration with Jenkins

OpenBSC/Osmocom continuous integration with Jenkins

This is part of a series of blog posts about testing inside the OpenBSC/Osmocom project. In this post I am focusing on continuous integration with Jenkins.

Problem

When making a new release we often ran into the problem that files were missing from the source archive. The common error was that the compilation failed due some missing header files.
The second problem came a bit later. As part of the growth of OpenBSC/Osmocom we took code from OpenBSC and moved it into a library called libosmocore to be used by other applications. In the beginning our API and ABI of this new library was not very stable. One thing that could easily happen is that we updated the API, migrated OpenBSC to use the new API but forgot to update one of the more minor projects, e.g. our TETRA decoder. 

Solution

The solution is quite simple. The GNU Automake buildsystem already provides a solution to the first problem. One simply needs to call make distcheck. This will create a new tarball and then build it. Ideally all developers use make distcheck before pushing a change into our repository but in reality it takes too much to do this and one easily forgets this step.
Luckily CPU time is getting more and more affordable. This means that we can have a system that will run make distcheck after each commit. To address the second part of the problem we can rebuild all users of a specific library, and do this recursively.
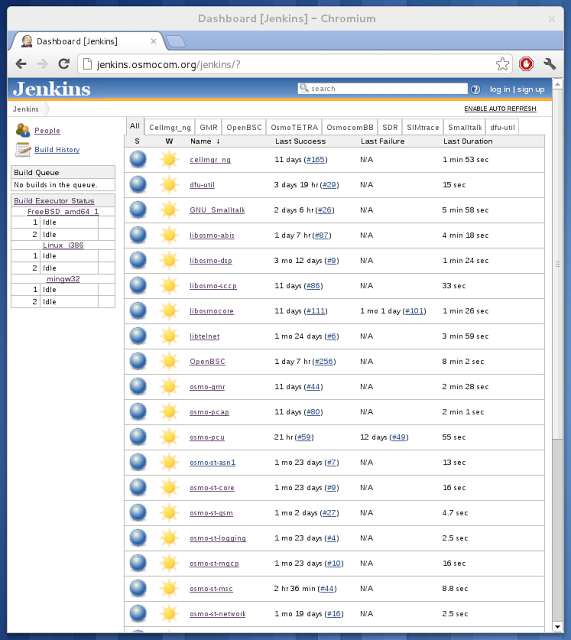
The buzzword for this is Continuous Integration and the system of our choice is Jenkins (formerly known as Hudson). Jenkins has the concept of a Job and a Node. A Job can be building a certain project, e.g. building libosmocore. A Node is a physical system with a specific compiler. A Job can instruct Jenkins to monitor our git repositories and then schedule the job to be build.
In our case we have nodes for FreeBSD/AMD64, Debian6.0/i386 and mingw/i386. All our projects are multi-configuration projects. For some of our Jobs we use it to build the software on FreeBSD, Debian and mingw for others only on Debian. Another useful feature is the matrix build. This way one job can build several different configurations, e.g. debug and release.
Jenkins allows us to have dependencies between Jobs and we are using this to rebuild the users of a library after a change, e.g. build libosmo-abis after libosmocore.
The build-status can be reported by EMail, irc but I generally use the RSS feed feature to find out about broken builds. This way I will be made aware of build breakages and can escalate it by talking to the developer that has caused the breakage.
Jenkins of Osmocom

Conclusion

The installation of Jenkins makes sure that the tarballs built with make dist contains everything needed to build the software package and we have no silent build breakages in less active sub-projects. A nice side-effect is that we have less Emails from users due build breakages. Setting up Jenkins is easy and everyone building software should have Jenkins or a similar tool.

Outlook

We could have more build nodes for more Linux distributions and versions. This mainly depends on volunteers donating CPU time and maintaining the Jenkins Node. Jenkins offers a variety of plugins and it appears to be easy to write new plugins. We could have plugins that monitor and plot the binary size of our libraries, check for ABI breakages, etc.
Testing in OpenBSC and Osmocom

Testing in OpenBSC and Osmocom

The OpenBSC and Osmocom project has grown a lot in recent years. It has grown both in people using our code, participating in the development and also in terms of amount of sourcecode. As part of the growth we have more advanced testing and the following blog posts will show what we are doing.

Each post will describe the problems we were facing and how the system deployed is helping us to resolve these issues.

Creating a small GUI for the SIMtrace application

Creating a small GUI for the SIMtrace application

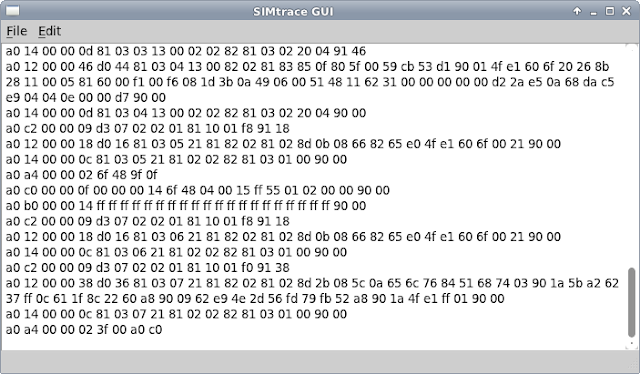
Earlier this year I created a Hardware company with a friend to supply to our GSM community and beyond. One of our first products is the SIMtrace Hardware (CC Licensed, actually it should work with any Smartcard). Today I had to wait a bit and decided to convert the CLI application that talks to the firmware to a GUI application. I did this by running the CLI part in a QThread and using QMetaObject::invokeMethod to callback to my GUI.

I started off creating the Qt application with VIM and a browser to help me to remember some function names. After a while I had enough of this and used Qt Creator and enjoyed the auto completion, it had no problem reading our C header files of libosmocore and provided auto completion for these too. Once again I am amazed how nice Qt Creator is and how little code I needed to create the below.

From October 13, 2011
GNU Smalltalk deployment with images and image resumption

GNU Smalltalk deployment with images and image resumption

Once up on a time I was sitting in a cold hall at the Barcelona exhibition ground, a power outage has taken down several DVB-H platforms (racks consisting of servers, streamers, RF equipment…) and once power was restored red LEDs were blinking, systems not coming up automatically, hordes of engineers trying to boot the right kernel, trying to remember the multicast routes they had typed in by hand, chaos, hectic. It was interesting to witness that as we could lay back, continue with our work, as our platform was configured to come up automatically and it did.

One has to assume that stuff breaks, software, disk, RAM, CPU, power supply, anything. The only answer to that is be prepared, build your software to deal with failure (or nicely try to restart), make sure all systems start automatically, have backups, have a plan.

For my GSM (telephony) in Smalltalk components I didn’t do that yet, mostly because my code was not very mature, I was still building up the trust relationship and so my deployment consisted of manually running GNU screen, then GNU Smalltalk, manually loading my code, starting things up. It was about time to correct that.

The tool of choice is the gst-remote application, it will run a GNU Smalltalk image, it can daemonize and it will listen for input from other systems. While moving to this deployment my fellow Smalltalkers were kind enough to fix some bugs on the way. There was an issue of gst-remote exiting when saving an image, the Delay class not functioning properly on resume, the wrong FileDescriptors being closed on image resumption. It is very nice to get help that fast!

My deployment now consists of building GNU Smalltalk packages, having a Smalltalk script to load the package and call start method of that package followed by taking a snapshot and exiting. I can then resume the image and if the software is prepared to deal with image resumption it will work.

Eval [
| name image |
name := Smalltalk arguments first.
image := Smalltalk arguments second.

(PackageLoader packageAt: name)
fileIn;
start.
ObjectMemory
snapshot: image;
quit.
]